Getting Started in Fust Survival
From beach rock and torch to a claimed foundation before your first wipe night.
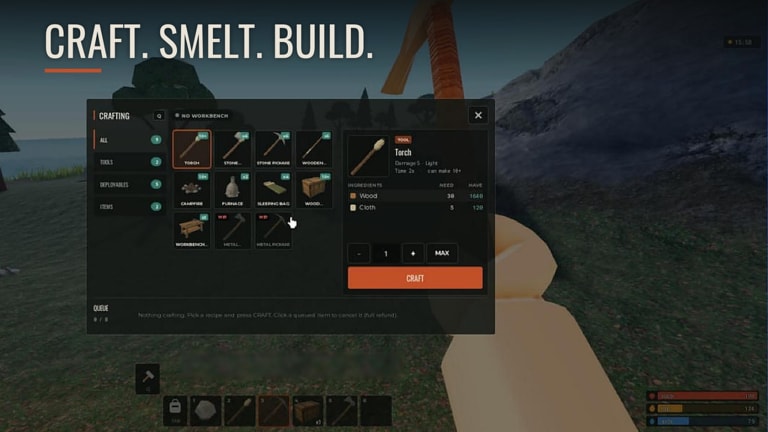
Fust Survival drops you on a Roblox beach with almost nothing: a rock, a torch, and a STARTER GOALS checklist on the HUD. Jimma Studios designed the early loop so every wipe feels the same — survive, build, then raid — but the first twenty minutes decide whether you own a Tool Cupboard or respawn naked forever. This walkthrough takes you from character select through a locked door and a sleeping bag without wasting gather time.
Character select and beach spawn
Customize skin, hair (Short or Bald), and face, then enter the server. You spawn on the shoreline. Memorize nearby trees, rock nodes, and any path inland toward Outpost or low-tier monuments. Open Controls if you need the full bind list; for now remember LMB to swing, Q to craft, M for the map, and the gear icon for settings and codes.
Vanilla servers run normal gather pace. Modded servers farm faster but enemies gear up faster too. New players usually learn cleaner on Vanilla until STARTER GOALS feel automatic.
STARTER GOALS — follow the HUD
The HUD goals are not optional fluff. Complete them in order:
- 250 Wood — swing trees with LMB. Trees also drop Cloth; bank Cloth for Bandages (4 Cloth, no workbench, 20 HP heal).
- 100 Stones — hit rock nodes on the beach and inland cliffs.
- Craft Building Plan — open Q, find it under early TOOLS / DEPLOYABLES with NO WORKBENCH recipes.
- Place a foundation — pick a quiet spot with trees and rocks in view, not on a highway to Outpost.
- Add a door — seal the shell before you AFK.
- Tool Cupboard — 1000 Wood under DEPLOYABLES. Claims the area, slows decay, blocks unauthorized builds.
- Sleeping Bag — set your respawn inside the claim.
Until the Tool Cupboard and bag are down, treat every death as a full restart. Do not leave the beach for oil rig or airfield before that claim exists.
First craft priorities after the plan
With Wood and Stones flowing, craft a Stone Pickaxe (200 Wood + 100 Stones). It unlocks Metal Ore and yellow Sulphur Ore crystals. Keep Bandages in hotbar slots. Smelt Metal Ore in a Furnace with Wood fuel — fuel also yields Charcoal you will need later for Gun Powder. Workbench 1 costs about 500 Wood and 50 Metal Fragments; place it inside the claim so you are not crafting in the open.
Full recipe chains and furnace tips live in Crafting and Resources. Base layout, airlocks, hammer upgrades, and upkeep are expanded in How to Build a Base.
First-hour checklist
- Finish every STARTER GOAL before monument runs.
- Keep Cloth → Bandages production continuous.
- Place Tool Cupboard centered so walls stay authorized.
- Put the Sleeping Bag behind the door, not outside.
- Redeem codes early via gear icon → ENTER CODE → REDEEM (case-sensitive). See Codes and How to Redeem for active lists.
- Glance at Friday Wipe so you know when the server resets.
Where to build your first shell
Avoid monument parking lots and cliff edges that snipers love. Prefer a pocket with two tree clusters and one rock field within a short loop. Place foundation, door, Tool Cupboard, then expand one triangle or square at a time. Add a simple airlock when you can afford a second door — walkthroughs for that pattern are in the base guide.
Solo players should stay small. A two-by-two with airlock beats a half-built mansion that bleeds upkeep. Read Solo Tips before you expand past one floor.
After the claim — what next
Once the bag is set:
- Farm Metal Ore and start Workbench 1.
- Scout Outpost on the Map and Monuments page for safer trades.
- Stock Charcoal and Sulphur only when walls feel stable — raid math is in How to Raid.
- Check Weapons Tier List before you dump crates into a bad primary.
Weapon Crates from codes and VIP are account-bound cosmetics across wipes, so redeeming early still pays even if Friday deletes your wood walls. Game pass helpers are listed under Game Passes.
Common early mistakes
Building without a Tool Cupboard wastes Wood when decay and griefers hit. Crafting Gun Powder before you have a door invites online raids you cannot answer. Ignoring Cloth means you fight with empty HP. Running Modded on day one without understanding tempo often ends in a geared neighbor deleting your shell. Stay on STARTER GOALS until the checklist clears, then scale with the sibling guides linked above.
When you finish this page, hop back to the Guides Hub for the full tree, or jump straight into building and crafting pages. The beginner video mid-article shows the same beach-to-base flow if you prefer watching once before grinding Wood.
Frequently Asked Questions
Quick answers to the most common Fust Survival questions.
What are STARTER GOALS in Fust Survival?
HUD objectives that walk you through 250 Wood, 100 Stones, Building Plan, foundation, door, Tool Cupboard, and Sleeping Bag. Finish them before monuments or raids.
How do I craft without a workbench?
Press Q and use NO WORKBENCH recipes for early tools, Bandages, Building Plan, and the Tool Cupboard. Workbench 1 unlocks after you smelt Metal Fragments.
When should I redeem codes?
As soon as you can open the gear icon menu. Codes are case-sensitive and often grant Weapon Crates that persist across Friday wipes.
Should solos build big on day one?
No. Claim a small door-and-bag shell first, then expand. See Solo Tips for footprint and upkeep advice.
Does progress save between sessions?
Progress saves on your server until the weekly Friday wipe. Cosmetics from Weapon Crates stay on the account across wipes.